Creating a Sensor Board
You can create and edit sensor boards using a graphical editor at any time.
You can either use a self-created sensor board only for yourself or share the sensor board with other users in your IRIS installation.
To create a new sensor board:
-
Click Sensor Board in the quick navigation (if available) or select Analytics > Sensor Board from the menu.
→ An overview of all sensor boards available to you appears. Those may be sensor boards you created yourself or sensor boards shared with you by colleagues.
-
If the sensor board to be created is very similar to an existing sensor board, click the “Duplicate” icon below the preview of this sensor board.
Otherwise, click the Add Sensor Board button in the toolbar.
→ The duplicated, or still blank, sensor board will be opened in editing mode.
To open an existing sensor board for editing:
-
Click Sensor Board in the quick navigation (if available) or select Analytics > Sensor Board from the menu.
→ An overview of all sensor boards available to you appears. Those may be sensor boards you created yourself or sensor boards shared with you by colleagues.
-
Click the Configure button below the preview of the desired sensor board.
→ The desired sensor board is opened in editing mode.
To edit the basic data of a sensor board:
- If not already done: Open the sensor board for editing (see Editing an Existing Sensor Board).
-
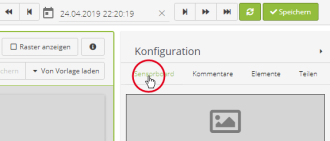
On the detail palette, activate the Sensor Board tab (only available if no element is highlighted on the sensor board).
- Make the required settings:
Parameter Meaning Background image Optional: Background image. Appears behind all elements. Scales automatically to the full size of the sensor board. Note: To remove a selected background image, click the “Delete” icon on the preview of the image.
Background colour Optional: Background colour of the sensor board. Appears behind all elements. Device The device whose sensor values are to be represented on the sensor board. Only sensors of this device can be selected later. Name Name of the sensor board. The sensor board can later be selected on the user interface under this name. Use as short and meaningful a name as possible under which you – and other users, if necessary – can later clearly recognize the sensor board. Description Optional: Complementary description. Later also appears on the selection page of the sensor board below the corresponding preview. Update interval Preset for the time interval in seconds after which the sensor board will load new data (can be adjusted at the sensor board display). Important: Do not choose the update interval shorter than necessary. Very short time intervals may have a negative effect on the execution speed of IRIS.
Aspect ratio Aspect ratio (width to height) of the sensor board.
To add a new element to the sensor board:
- If not already done: Open the sensor board for editing (see Editing an Existing Sensor Board).
-
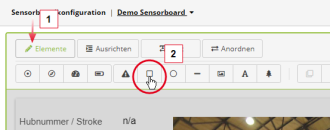
Click Elements in the header of the editor, then on the icon of the desired element.
→ The newly added element will appear at the top left of the sensor board (even if there are other elements).
- Move the element to the desired position.
-
Adjust the settings for the element in the Element Configuration tab on the detail palette.
A detailed description of all elements and their parameters can be found at Reference: Sensor Board Elements and Parameters.
- Finally, click Save in the toolbar.
For an efficient insertion and positioning of the elements the sensor board editor offers various editing functions and shortcuts:
|
Select one or several elements |
To select a single element: > Click the element or select the element from the list in the Elements tab on the detail palette. To select several elements simultaneously (so you can later apply an action to all those elements simultaneously with one command): > Hold the Shift key and click the elements to be selected one after the other. If the elements are located directly next to each other, you can also drag your mouse over the elements to be selected while holding the left mouse button. |
|
Group elements |
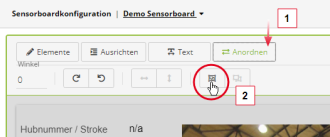
To group several elements so that you can always select them together in the future with a simple click: To undo a grouping: > Highlight the group, click Arrange and then on the “Undo grouping” icon. |
|
Move one or several elements |
To move one or several elements on the sensor board:
|
|
Align elements
|
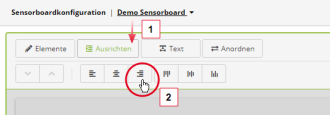
To simplify the visual alignment, you can show a grid on the sensor board: > To do so, click the Show Grid button in the header. To align several elements precisely on a common line:
|
|
Arrange elements on top of each other |
To specify the order in which elements cover each other when elements are overlapping each other:
|
|
Rotate and mirror elements |
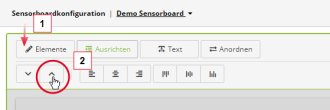
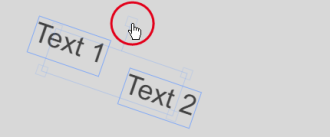
To freely rotate one or several elements:
To align one or several elements at a given angle:
Here you can also mirror elements horizontally or vertically if required. |
|
Duplicate elements |
If you would like to insert elements which largely or completely correspond to existing elements, you can duplicate (clone) the existing elements:
|
|
If you are going to need certain elements on other sensor boards, you can save those elements as one or several templates and later load those templates in other sensor boards. To save elements as a template:
To load elements from a template:
|
|
|
Delete elements |
To delete one or several elements:
|
|
Undo an action |
Most actions can be undone if required. > Click the Undo button in the header or use the keyboard shortcut Ctrl+Z. |
You must assign a data series to all elements of the sensor board which are directly or indirectly visualising data (sensor values):
- elements displaying a sensor value directly as a numeric value or on a tachometer or as a progress bar
- Elements whose visibility or appearance you want to make dependent on a sensor value via conditions
To assign a data series to an element:
- If not already done, open the sensor board for editing (see Editing an Existing Sensor Board).
- Highlight the element to which you want to assign the data series.
- Activate the Element Configuration tab on the detail palette.
-
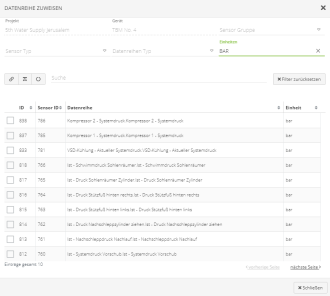
Under Data Series, click the text Please select a data series.
→ The selection window Assign Data Series is displayed.
Note: Only sensors of the device are available which has been assigned to the sensor board in its basic data (see Defining Basic Data of a Sensor Board).
Tip: If you would like to display values which are not directly available as sensor values and must be calculated from one or several sensor values, you can define a virtual data series in the system configuration. If you do not have sufficient user rights for this, contact an IRIS administrator if necessary.
-
Select the desired data series.
Tip: Use the search and filter functions to quickly find a certain sensor.
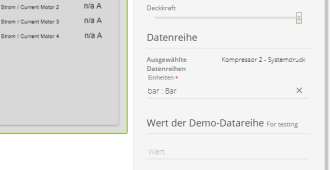
→ Once you have selected a sensor, the selection window closes automatically. The name of the data series appears on the detail palette. The unit of measurement in which the values are specified and evaluated is displayed immediately below.
Tip: Depending on the underlying physical quantity, you can optionally select a different unit of measurement here. In this case, IRIS automatically converts the sensor values to this unit.
- Click Save in the sensor board configuration.
Using conditions, you can integrate dynamics in your sensor board and make the visibility or the appearance of an element dependent on a sensor value linked to the element.
Examples:
- green icon or visible element for “on” state, red icon or invisible element for “off” state
- green icon for a value in the non-critical range, yellow icon for a value close to the critical range, red icon for a value in the critical range
The properties of an element that you can link to conditions depend on the type of element. For example, for a text, those properties are visibility, font, colour, frame, background colour, and opacity.
To create conditions for an element:
- If not already done, open the sensor board for editing (see Editing an Existing Sensor Board).
- Highlight the element to which you want to assign a condition.
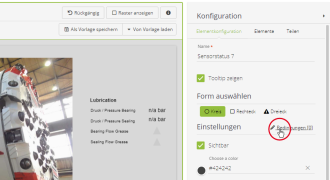
- Activate the Element Configuration tab on the detail palette.
-
Click Conditions.
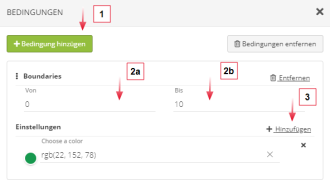
→ The Conditions window is displayed.
-
Click Add Condition.
→ Additional fields appear.
- Enter the upper and lower range limit of the condition. The numeric values refer to the unit of measurement selected for the linked data series (see Assigning a Data Series).
-
Click Add to define which property of the element should receive a new value when the condition is fulfilled. The properties of an element available here depend on the type of element.
Tip: You can use the same condition to change several properties simultaneously (example: font and font size of a text element). To do so, click Add again.
-
Optionally, you can add any number of other conditions, thus giving the element multiple appearances depending on different ranges of values (e.g. green icon for a value in the non-critical range, yellow icon for a value close to the critical range, red icon for a value in the critical range). To do so, click the Add Condition button again.
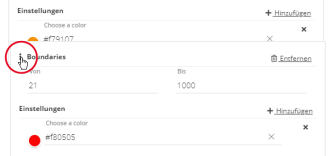
Important: If several conditions are present, the condition further up in the list will be considered last. For overlapping value ranges, this means that the condition further above will be applied.
If you would like to change the order of conditions, click the “Move” icon of a condition, hold the mouse button and drag the condition to the desired position.
- In the Conditions window, click Save.
-
If you have already linked the element to a data series (see Assigning a Data Series), you can instantly test the defined conditions: To do so, enter different values subsequently in the field Test Value in the Element Configuration tab and observe whether the element changes as required.
- Click Save in the sensor board configuration.
If you have created a sensor board that is also useful for other users, you can share this sensor board with other users of your IRIS installation. You can decide whether all users or only selected users should have access to the sensor board.
Important: Any user with access to the sensor board can change or delete it.
To share a sensor board with other users:
- If not already done, open the sensor board to be shared for editing (see Editing an Existing Sensor Board).
-
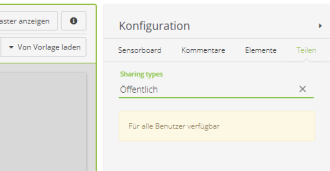
On the detail palette, activate the Share tab (only available if no element is highlighted on the sensor board).
-
Select the persons with whom you wish to share the sensor board.
- Private: Does not share the sensor board. Only you can use the sensor board.
-
Public: Shares the sensor board with all users of your company-specific IRIS installation.
- Specific: Shares the sensor board only with selected users or user groups.
-
If you select the option Specific, you will see two additional tabs below the pick list: User and User Groups. Select by clicking which users and user groups you would like to grant access to the collection of charts.
- Click Save in the toolbar.
You have the option to enter comments on each sensor board. For example, you can document the purpose of the sensor board or record reasons for changes.
If you are sharing the sensor board with other users, those users can also see your comments. Similarly, you will also see comments from other users.
To enter a comment for a sensor board:
- If not already done, open the sensor board for editing (see Editing an Existing Sensor Board).
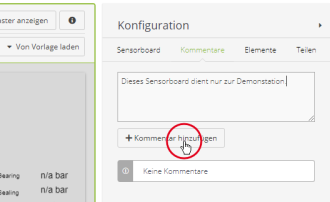
- On the detail palette, activate the Comments tab (only available if no element is highlighted on the sensor board).
-
Enter your comment in the input field.
-
Click Add Comment.
→ The comment appears below the input field.
- Click Save in the toolbar.


